Notifications
Configure Push notifications
All the public APIs in the SDK should be called after initializing the SDK via Helpshift.install() API
Push notifications via Helpshift

Helpshift allows you to send Push notifications when an agent replies to a conversation.
Prerequisites
Implement FCM push in your app.
For FCM, refer to the Firebase Cloud Messaging documentation.
Configure Helpshift Agent Dashboard
To enable the Helpshift system to send push notifications to your users you will have to add an Android as a platform in your app (if you have not added already). And then click on the push notifications option.

Enter your FCM key credentials per app, via the Settings page > App listing in the left navigation > Scroll down to Push Notifications settings section for the app.
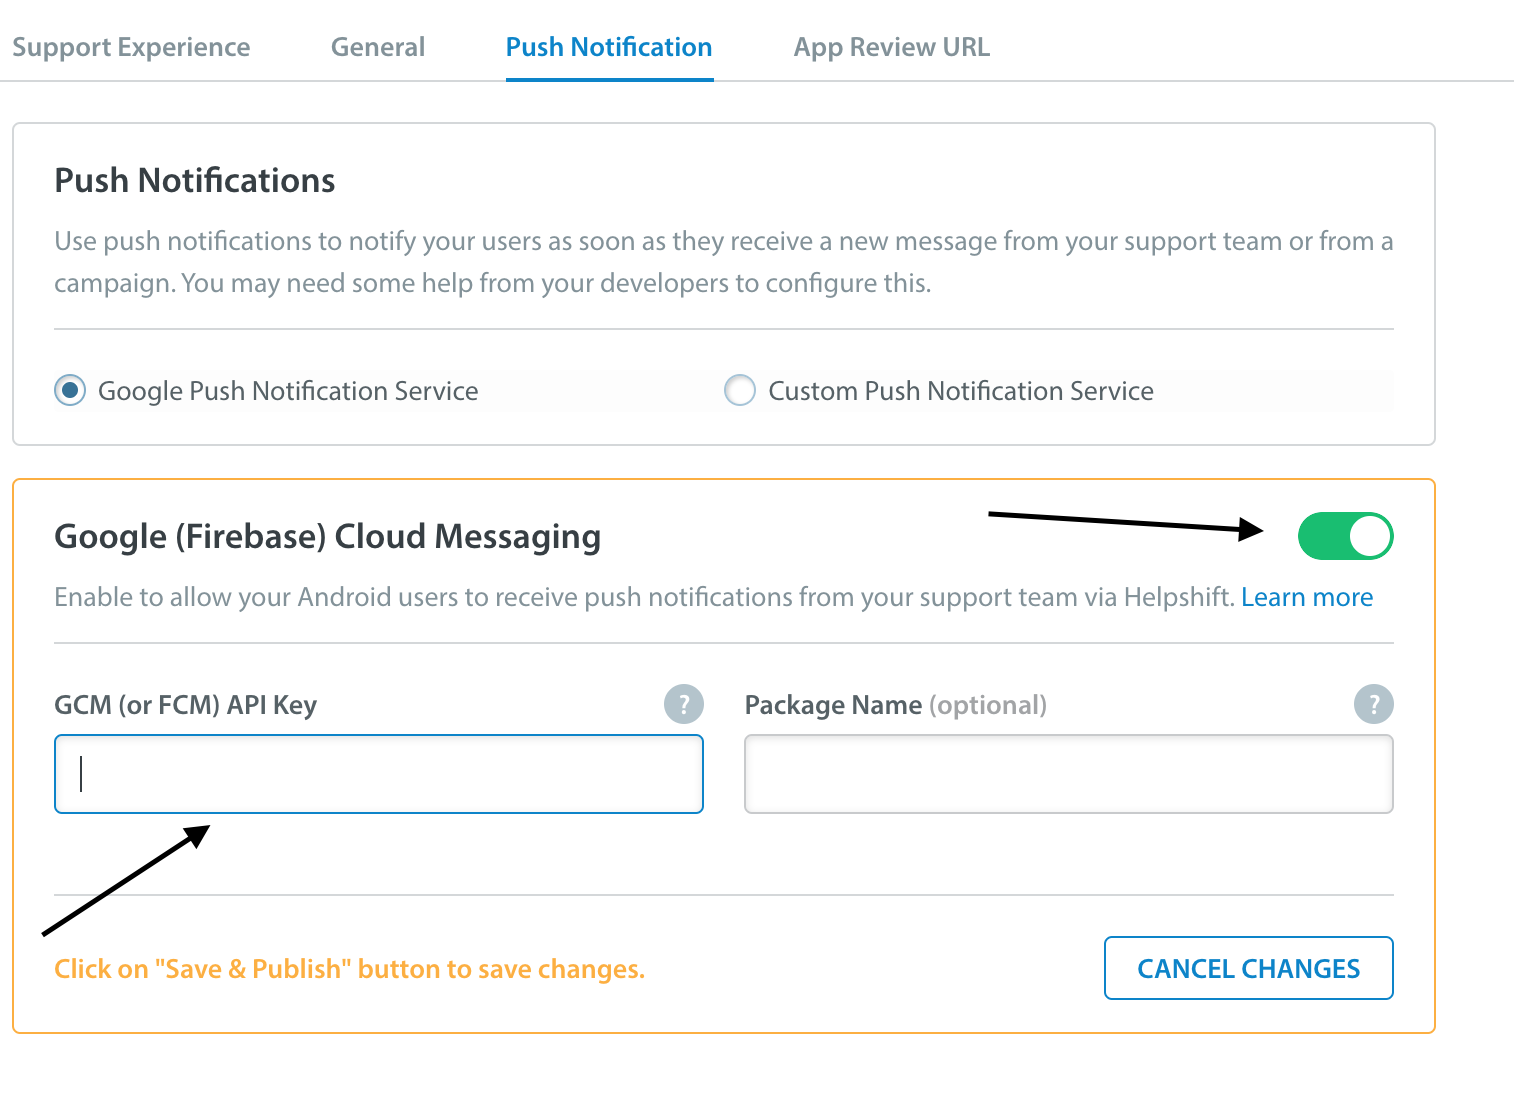
For FCM users, the API key can be found at your
Firebase API Console
.show me 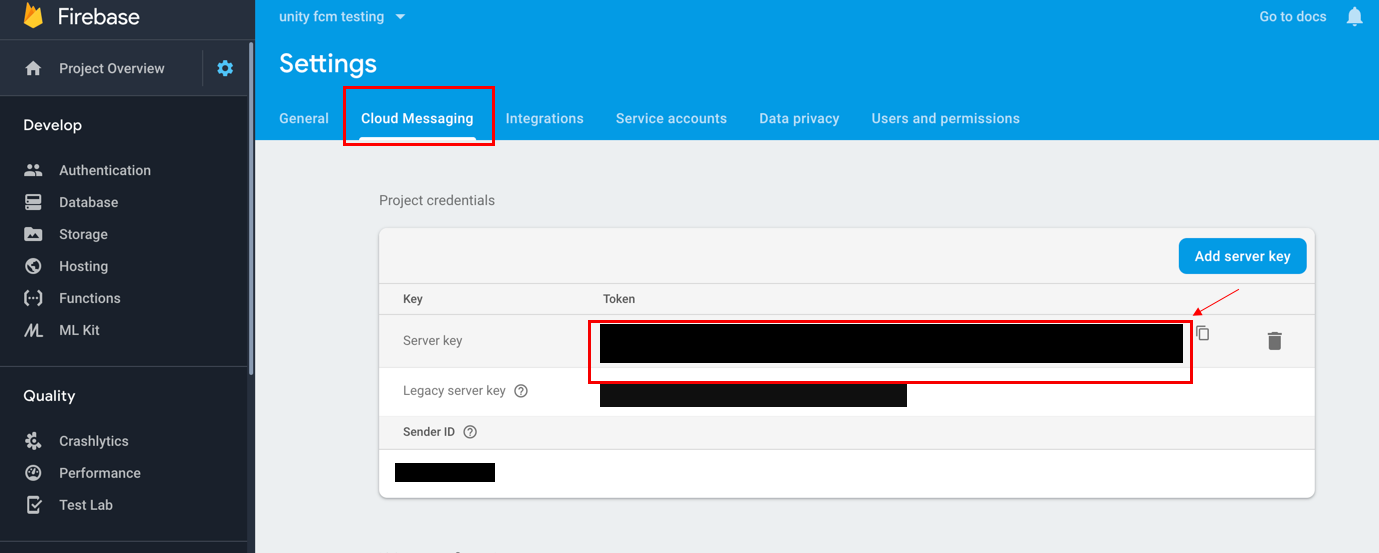
Configure SDK
-
Send the device registration id to Helpshift via the
Helpshift.registerDeviceTokenAPIpublic class MyFirebaseMessagingService extends FirebaseMessagingService { // ... @Override public void onNewToken(String newToken) { // your logic to save the token here for the app Helpshift.registerPushToken(newToken); }
}
-
Using FCM's new
FirebaseMessagingServicewhich provides "RemoteMessage" argument, you should useHelpshift.handlePushAPI which takes a Map argument.@Override public void onMessageReceived(RemoteMessage message) { Map<String, String> data = message.getData(); String origin = data.get("origin"); if (origin != null && origin.equals("helpshift")) { Helpshift.handlePush(data); } }
In-app notifications
In-app notifications are similar to notifications in the notification drawer . Unlike push notifications, they appear only when you app is running.
These notifications are sent when an agent replies to a customer's issue. Your customers can go straight into the conversation screen when they tap on the notification.
If the FCM device token is registered for push notifications, then in-app notifications will be disabled. In-app notifications are disabled to avoid duplicate notifications from both push notifications and in-app notifications.
Customizing notification icons
By default the application icon is used as the notification icon. You can customize the notification icons using the config in the install call.
public class MainApplication extends Application {

  @Override
  public void onCreate() {
    super.onCreate();

    Map<String, Object> configurations = new HashMap<>();
    configurations.put("notificationIcon", R.drawable.notification_icon);
    configurations.put("notificationLargeIcon", R.drawable.notification_large_icon);

    // Install call
    Helpshift.install(this,
                      "<PLATFORM_ID>",
                      "<DOMAIN>",
                      configurations);
  }
}
Customizing notification sound
By default the default device notification sound is used for helpshift notifications. You can customize the notification sound using the config in the install call.
For example:
public class MainApplication extends Application {

  @Override
  public void onCreate() {
    super.onCreate();

    Map<String, Object> configurations = new HashMap<>();
    configurations.put("notificationSoundId",  R.raw.notification_sound);

    // Install call
    Helpshift.install(this,
                      "<PLATFORM_ID>",
                      "<DOMAIN>",
                      configurations);
  }
}
Customizing notification channels
Starting from Android Oreo, Helpshift notifications will create a default channel named In-app Support. If you want to customize the name and description for the default channel, you can do so by using the config in the install call.
Example:
public class MainApplication extends Application {

  @Override
  public void onCreate() {
    super.onCreate();

    Map<String, Object> configurations = new HashMap<>();
    configurations.put("notificationChannelId",  "your channel name here");

    // Install call
    Helpshift.install(this,
                      "<PLATFORM_ID>",
                      "<DOMAIN>",
                      configurations);
  }
}
Configuring in-app notifications
If you do not want the in-app notification support provided by the Helpshift SDK, you can set the flag to false. The default value of this flag is true i.e., in app notification will be enabled.
Flag:enableInAppNotificationValues:true/falseDefault:true
Example:
public class MainApplication extends Application {

  @Override
  public void onCreate() {
    super.onCreate();

    Map<String, Object> configurations = new HashMap<>();
    configurations.put("enableInAppNotification",  false);

    // Install call
    Helpshift.install(this,
                      "<PLATFORM_ID>",
                      "<DOMAIN>",
                      configurations);
  }
}
Showing notification count when replies are sent to the user
To fetch unread messages count from the server you can call requestUnreadMessageCount(boolean shouldFetchFromServer) API. This API will return unread messages count via delegate.
Based on the value of shouldFetchFromServer, the locally stored count will be returned if shouldFetchFromServer is false else from the server by fetching remotely when shouldFetchFromServer is true.
private void updateAppBadgeCount(){
    Helpshift.requestUnreadMessageCount(true)
}

// ...
Helpshift.setHelpshiftEventsListener(new HelpshiftEventsListener() {
  @Override
  public void onEventOccurred(@NonNull String eventName, Map<String, Object> data) {
    switch(eventName){
      case HelpshiftEvent.RECEIVED_UNREAD_MESSAGE_COUNT:
        int count = (int) data.get(HelpshiftEvent.DATA_MESSAGE_COUNT);
        boolean fromCache = (boolean) data.get(HelpshiftEvent.DATA_MESSAGE_COUNT_FROM_CACHE);
        if (fromCache) {
          Log.d("Notification Count", "local" + count);
        } else {
          Log.d("Notification Count", "server" + count);
        }
    }
  }
// ...
- The notification count is fetched via this API from the SDK cache and Helpshift's servers (indicated by the value of
fromCachein the example above). However, the count from Helpshift’s servers is rate limited and it returns the value only if a subsequent call is made to the API, after the reset timeout or when the user just closes the chat screen (whichever is earlier). For an active issue, the reset timeout is 1 minute and 5 minutes for inactive issues.