Getting Started iOS
You're 3 steps away from adding great in-app support to your Unity game.
Guide to integrating the Unity plugin for the Helpshift SDK X which you can call from your C# and Javascript game scripts.
Requirements
- Unity 2018.1.0 and above.
- Xcode 12.0 and above.
- Supported iOS versions:
- iOS 16, 15, 14, 13, 12, 11, and 10
Download HelpshiftX Unity SDK for iOS
HelpshiftX SDK .zip folder includes:
- helpshiftX-plugin-unity-v10.2.1.unitypackage
- Unity package of HelpshiftX SDK
- unity-jar-resolver (v1.2.170.0)
- Resolves Android Helpshift package support lib dependencies.
Add Helpshift to your Unity project
- Unzip the HelpshiftX Unity SDK package.
- HelpshiftX Unity SDK appears as a standard
.unitypackagewhich you can import through the Unity package import procedure. - Following are the steps to import the
helpshiftX-plugin-unity-version.unitypackageinto your Unity game:- In the Open Unity project, navigate to Assets drop-down menu and select the Import Package > Custom Package
- From the unzipped SDK, select
helpshiftX-plugin-unity-version.unitypackagefile to import the Helpshift SDK. - Click Import.
Mandatory verification step for packages downloaded from Unity Asset Store
-
On adding Helpshift package to your project you will see a menu option
Helpshift/Verificationin the main menu bar of Unity IDE. -
You will need to provide the
Domain nameandApp ID (same as Platform ID)for either Android or iOS platform and thenVerifythe package.- You can find these IDs in Step 3 below.
-
Wait for package verification to be successful.
-
This verification is mandatory to avoid Android/iOS build failures.

-
This verification needs to be done only once.
-
You can commit the files generated in
Assets/Helpshift/Editor/Resources/to your version control system to share this verification result across developers in your organisation.
Info.plist changes - Addition of usage description strings
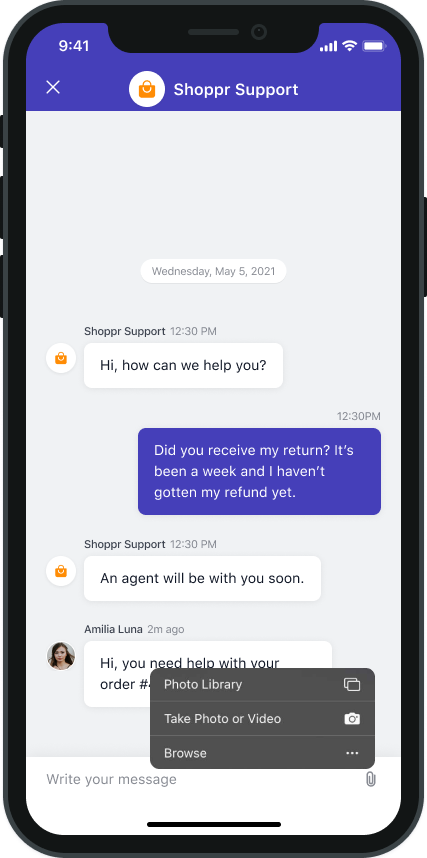
When the “User Attachments” feature is enabled from the In-app SDK Configuration section, the SDK allows the user to upload the attachments. The attachments can be picked from the Photo Library or can be captured directly using the camera. The options for these sources look like:
To use the camera and photo library, Apple requires the app to have Usage Description strings in the Info.plist while. Failing to add these strings might result in app rejection. The following strings are needed for the attachment feature:
| Key | Suggested string | Notes |
|---|---|---|
| NSPhotoLibraryUsageDescription | “We need to access photos library to allow users manually pick images meant to be sent as an attachment for help and support reasons.” | This is not needed if your app is iOS 11 or above. Below iOS 11, this key is compulsory else the app may crash when user tries to open the photo library for attaching photos. |
| NSCameraUsageDescription | “We need to access the camera to allow users to click images meant to be sent as an attachment for help and support reasons.” | This key is needed for capturing a photo using camera and attaching it. |
| NSMicrophoneUsageDescription | “We need to access the microphone to allow users to record videos using camera meant to be sent as an attachment for help and support reasons.” | This key is needed for capturing a video using camera and attaching it. |
Note that the above strings are just a suggested description. If you need localisations for the same, please Contact Us
End-users can attach files such as pdf, video, etc in their issues. For iOS 10 and below, to access files in the “Files” app of iOS, developers will need to add iCloud capability with iCloud Documents services enabled. For more info please refer the Prerequisites section here.
show me 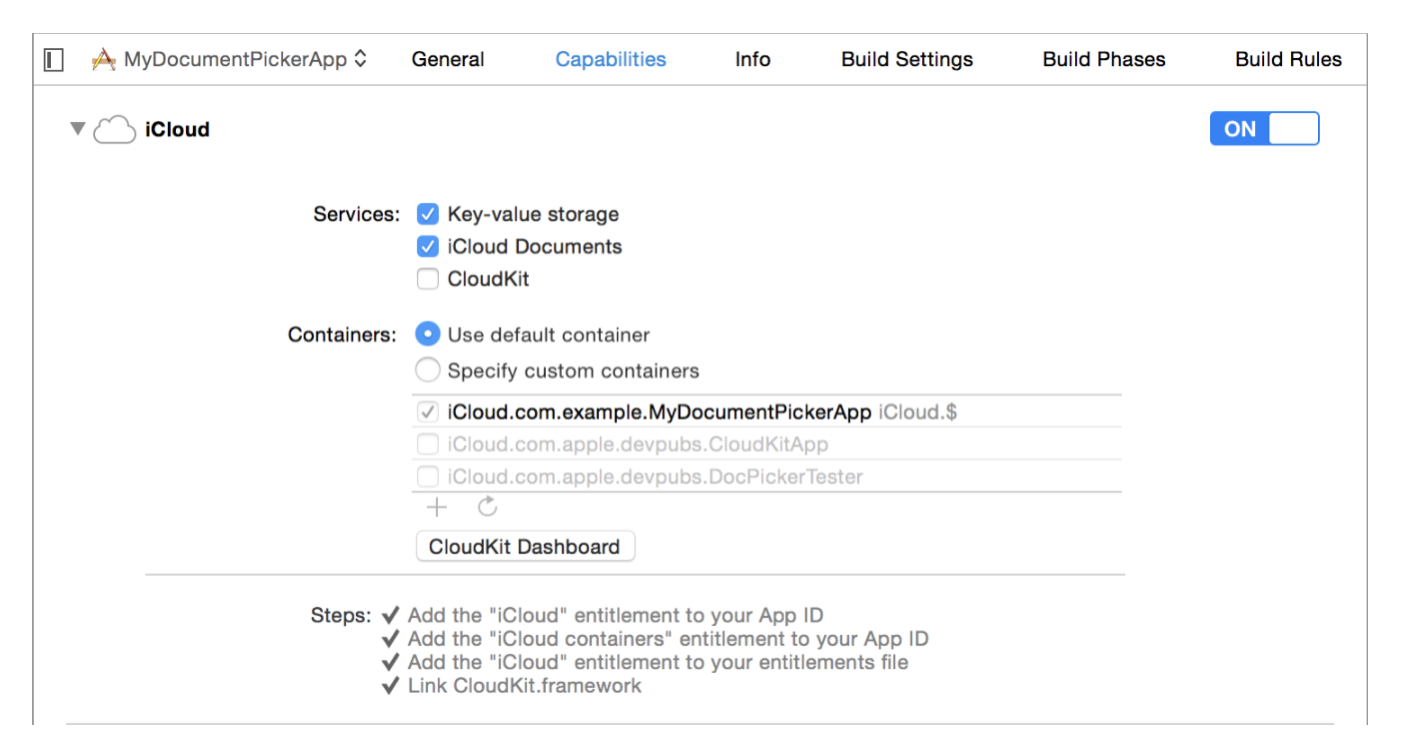
Initializing Helpshift in your app
Helpshift's namespace
To use Helpshift's APIs, please import the Helpshift's namespace like below
using Helpshift;
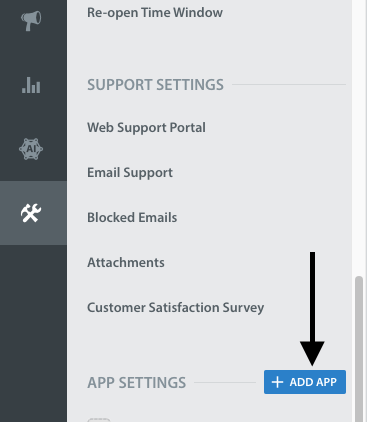
-
First, create an app on the Helpshift Dashboard show me
-
Create an app with iOS as a selected
Platformshow me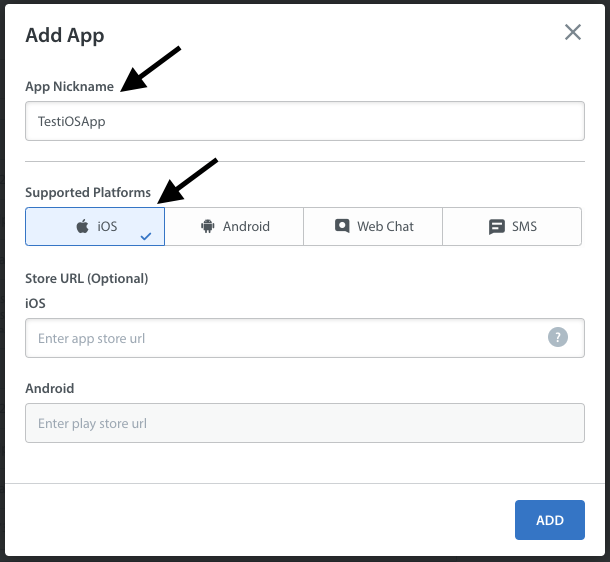
Helpshift uniquely identifies each registered App with a combination of 2 tokens:
Domain Name- This is your Helpshift domain name e.g. happyapps.helpshift.com
Platform ID- Your App's unique App id
Settings>SDK (for Developers) in your agent dashboard.
Select your App and check webchat as a platform from the dropdowns and copy
the 2 tokens to be passed when initializing Helpshift.
show me 
Initialize Helpshift by calling the method install(appId, domain) API
using Helpshift;
.
.
.
public class MyGameControl : MonoBehaviour
{
    private HelpshiftSdk help;
    ...

    void Awake() {
        help = HelpshiftSdk.GetInstance();
        var configMap = new Dictionary<string, object>();
        help.Install(appId, domainName, configMap);
    }
    ...
}
Install Helpshift via ObjC
If you intend to initialize the SDK from Xcode using Objective C, You can specify Domain Name, Platform ID and other install configurations in the Objective-C code. To do this you need to override application:didFinishLaunchingWithOptions in HsUnityAppcontroller as shown below.
#import <HelpshiftX/HelpshiftX.h>
#import "HelpshiftX-Unity.h"

- (BOOL) application:(UIApplication *)application didFinishLaunchingWithOptions:(NSDictionary *)launchOptions {
    // Set install configurations
    NSDictionary *installConfig = @{@"enableInAppNotification":@YES};

    // Make install call
    [Helpshift installWithPlatformId:@"<your_platform_id>" domain:@"<your_domain_name>" config:installConfig];
    return [super application:application didFinishLaunchingWithOptions:launchOptions];
}
Start using Helpshift
Helpshift is now integrated in your app. You should now use the support APIs inside your app to experience the functionality provided by the Helpshift SDK
Next up
![]()
Helpshift APIs
Discover ways to do customer support via Helpshift.
![]()
Design
Theming and Skinning your SDK to look like your App.
![]()
Notifications
Configure Push and In-app notifications.
![]()
Tracking
Track events and user actions. Attach custom metadata to every conversation.
![]()
Going International
Localizing & Internationalizing your in-app Support.