Helpshift’s Legacy SDKs (SDK Version <=7.x.x) will see end of life as of 31 Dec 2022 and end of support as of 31 March 2023.
Getting Started
New to Helpshift? Try out sample projects in 3 clicks -
Or, follow these simple steps to add Helpshift in-app support to your iOS App right away -
Requirements
- Xcode 12.0 and above.
- Cocoapods v1.10.0
- Supported iOS versions:
- iOS 15, 14, 13, 12, 11 and 10
If you are using the SDK version 7.7.x and want to upgrade to 7.8 or if you have already upgraded to 7.8.0 or 7.8.1, we highly recommend that you upgrade to 7.8.2.
With version 7.5.0, Helpshift SDK has dropped support for iOS 9. If you wish to keep supporting iOS 9 devices for your apps, please read the KB Article to support Helpshift on older OS versions.
For versions 7.4.0 and below, due to a bug in Xcode 10+, the Helpshift SDK will not be compatible with iOS versions below 9.3 Unfortunately till the time Apple fixes the bug with Xcode 10.2 or higher, we have decided to drop support for iOS 9.2 and below for SDK version 7.4.0 and below
Automated Integration using Cocoapods
To start using Helpshift v7.11.2 in your project, add one of the following lines to your Podfile according to the version which you wish to integrate.
pod 'Helpshift', '7.11.2'            # For normal version
pod 'Helpshift', '7.11.2-bitcode'    # For bitcode version
And run pod install or pod update to refresh your
cocoapods dependencies.
If your app does not contain any swift code, then set Always Embed Swift Standard Libraries in the Build Settings to YES
You can now move on to Initializing Helpshift in your App.
Manual Integration
Get the latest SDK zip
Download the latest for the Helpshift iOS SDK.
The zip file contains
- Helpshift.xcframework
- Non bitcode version of Helpshift framework
- Bitcode/Helpshift.xcframework
- Bitcode compatible version of Helpshift framework
- HelpshiftCustomLocalizations/
- Folder containing language translations which can be used to create the HelpshiftCustomLocalization bundle. This is just for reference
- HelpshiftCustomThemes/
- Folder containing skinning configuration to match the design of your app
- NOTICE.txt/
- License information about third-party code.
Add the latest stable SDK release to your project
- Unzip the SDK and drag drop
Helpshift.xcframeworkinto the Frameworks, Libraries and Embedded content in the General section of your Xcode project. - If your app does not contain any swift code, set
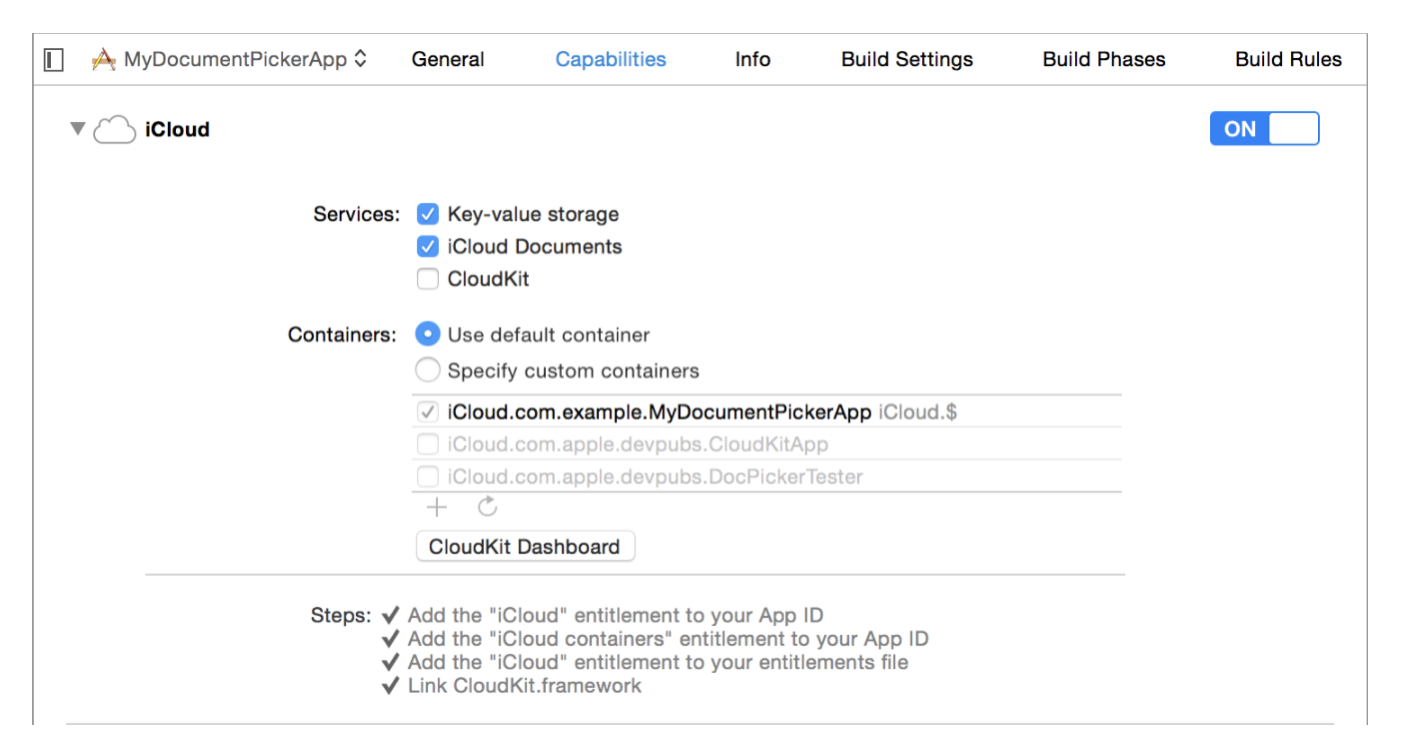
Always Embed Swift Standard LibariesunderBuild Settingsto YES - With version 7.7.0, End-users will be able to send files such as pdf, video, etc. where before 7.7.0 end-users could only send images. For iOS 10 and below, to access files in the “Files” app of iOS, developers will need to add iCloud capability with iCloud Documents services enabled. For more info please refer the Prerequisites section here.
show me
Add NSPhotoLibraryUsageDescription key in your application info plist file
If your app does not use this permission, you would need to add this key as well as description for the same. Not adding this key-description pair might cause app rejection.
Description text: “We need to access photos library to allow users manually pick images meant to be sent as attachment for help and support reasons.”
Note that this is just a suggested description. If you need localisations for the same, please Contact Us
Please replace all the old files with new files.
Start using Helpshift
Helpshift is now integrated in your app and ready to collect meaningful data about your users.
Initializing Helpshift in your app
Helpshift uniquely identifies each registered App using a combination of 3 tokens:
API Key- Your unique developer API Key
Domain Name- Your Helpshift domain name without any http: or slashes. E.g. happyapps if your account is happyapps.helpshift.com
App ID- Your App's unique ID
You can find these tokens by navigating to Settings>SDK (for Developers) in
your agent dashboard.
Select your App and the correct platform from the dropdowns and copy
the 3 tokens to be passed when initializing Helpshift.
show me 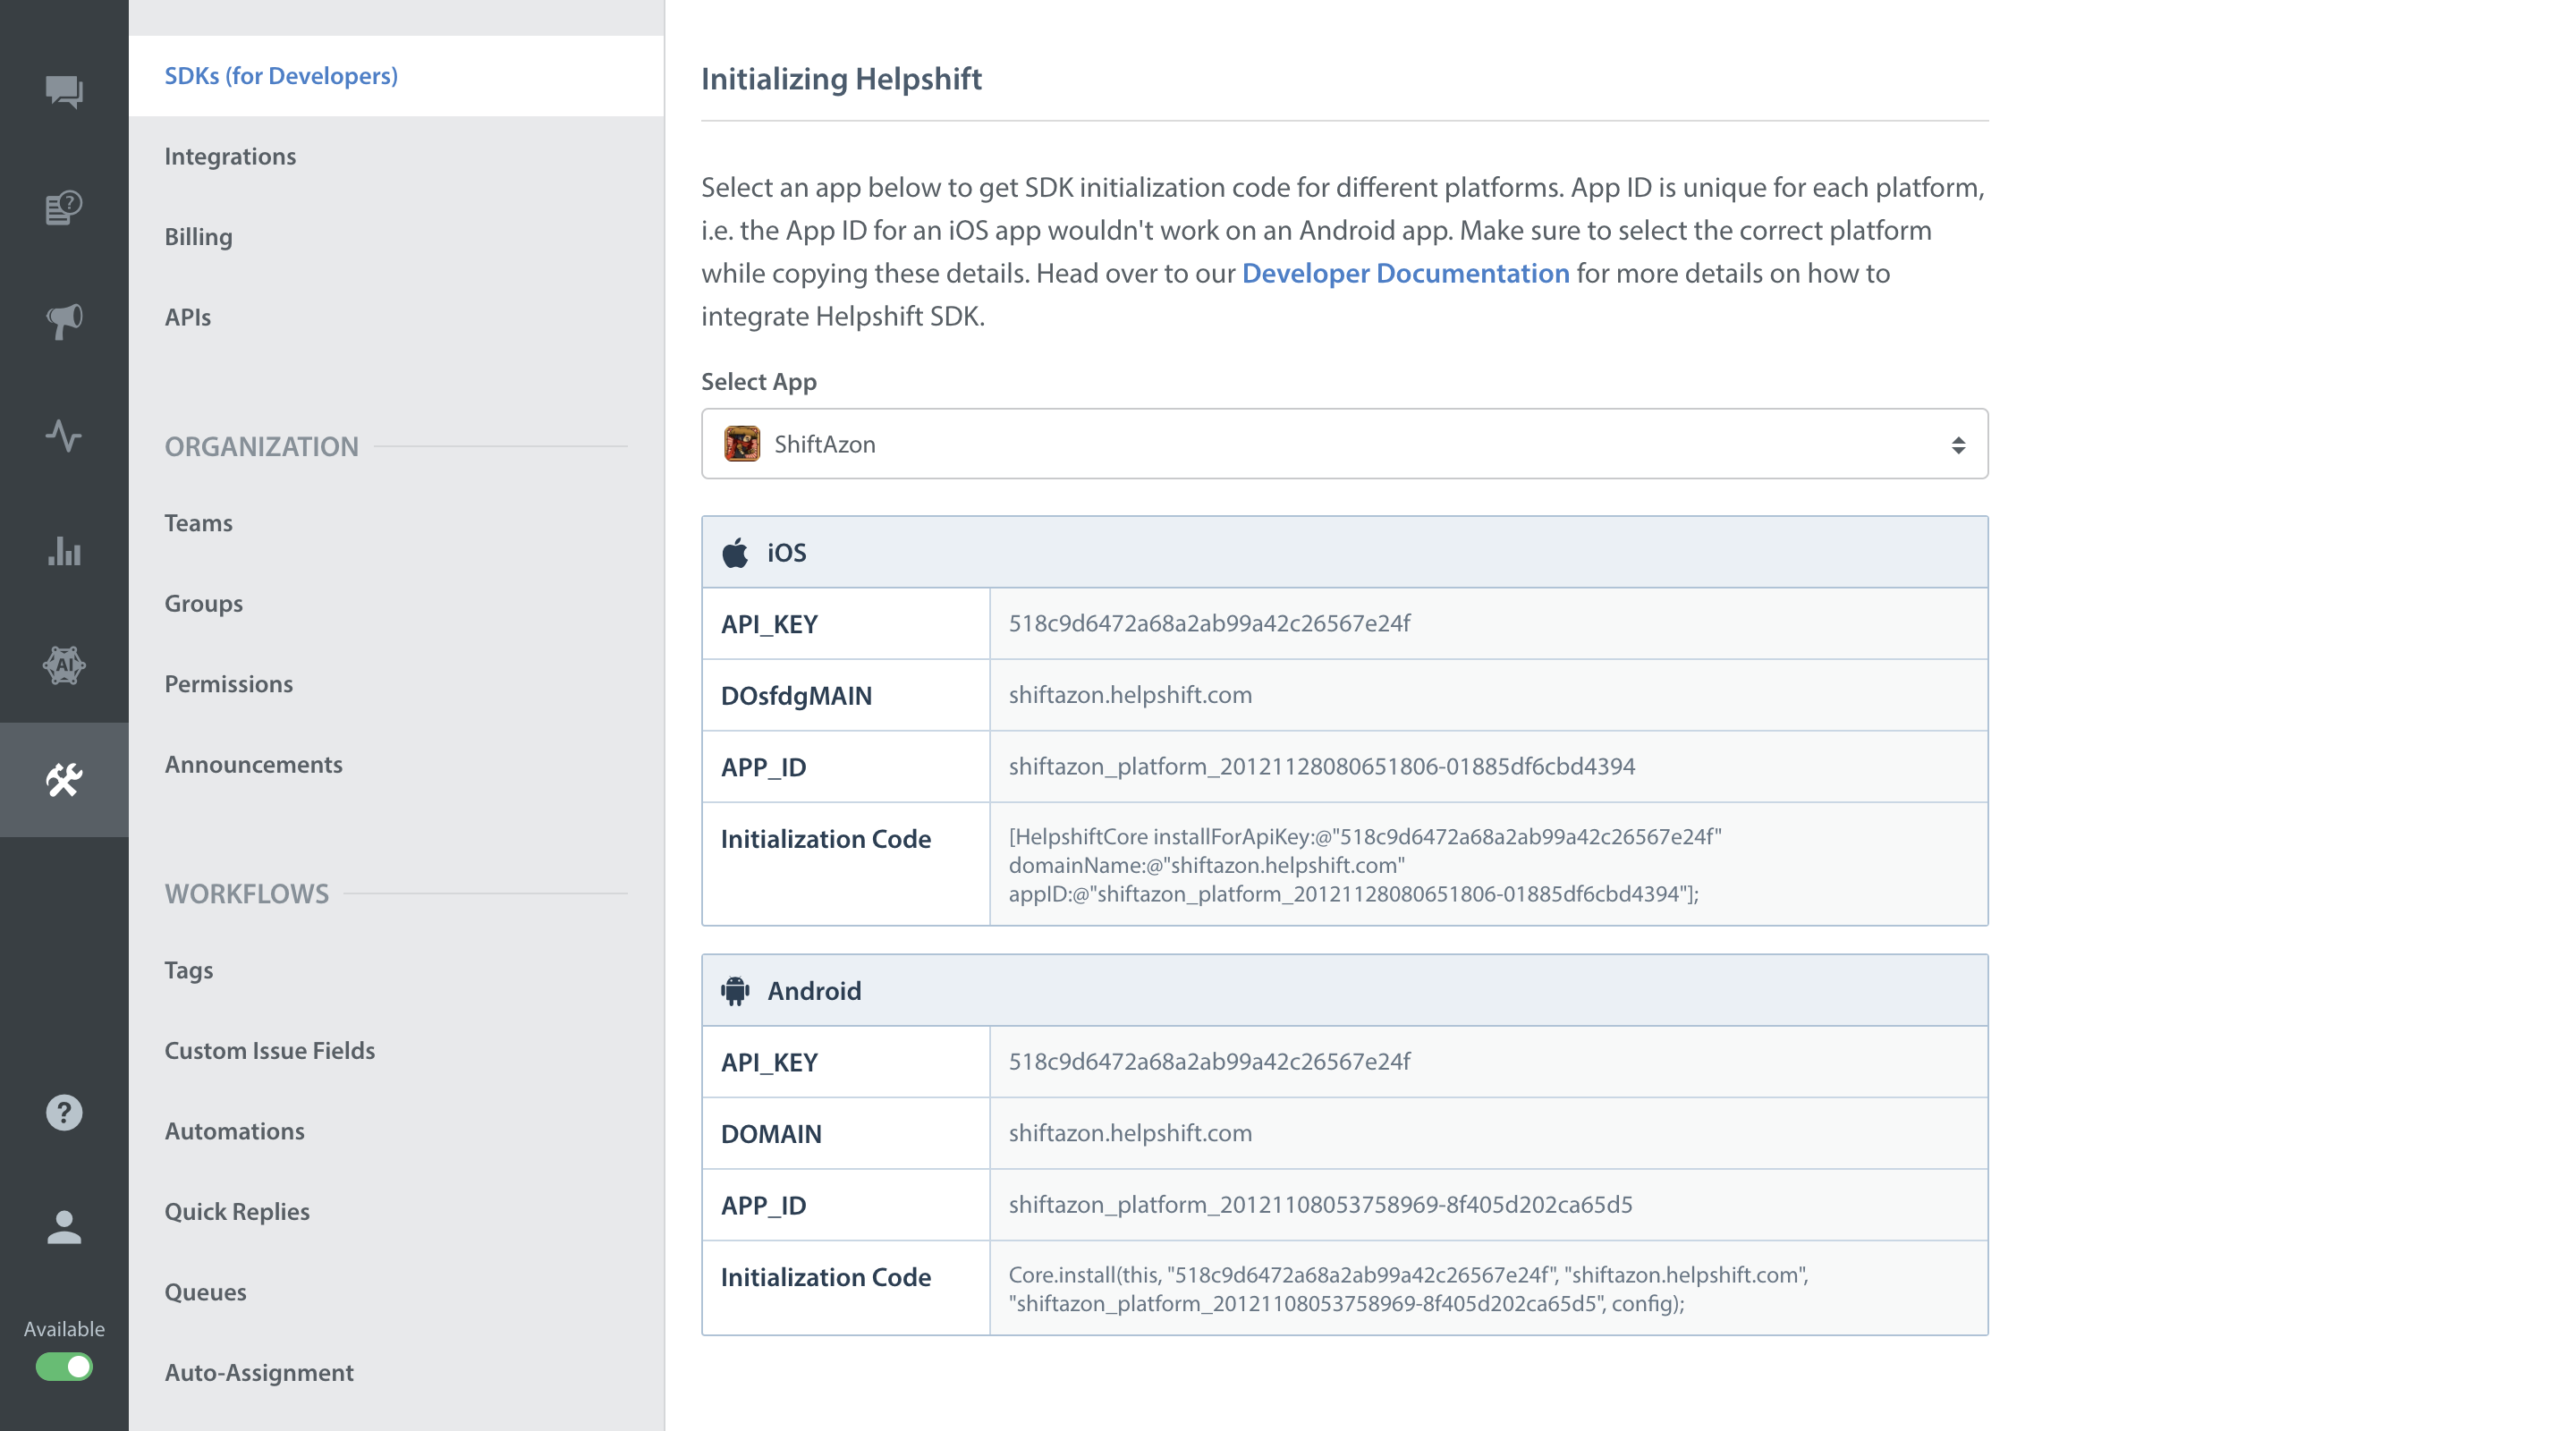
Initialize Helpshift by calling the HelpshiftCore's install function:
- Initialize the
HelpshiftCorewith the Helpshift service that you want to use. - Call the
HelpshiftCore'sinstallfunction.
@import Helpshift;
...
- (BOOL)application:(UIApplication *)application didFinishLaunchingWithOptions:(NSDictionary *)launchOptions
{
    ...
    [HelpshiftCore initializeWithProvider:[HelpshiftSupport sharedInstance]];
    [HelpshiftCore installForApiKey:@"YOUR_API_KEY" domainName:@"YOUR_HELPSHIFT_DOMAIN" appID:@"YOUR_APP_ID"];
    ...
    return YES;
}
Placing the install call
You should not place the install call anywhere other than application:didFinishLaunchingWithOptions:
Placing it elsewhere might cause unexpected runtime problems.
From version 5.7.0 and above the Helpshift install call will throw InstallException in case the validation of the
SDK keys fail.
Troubleshooting
If you are having issues with Helpshift integration, head over to the Troubleshooting section for further information.
Next up
![]()
Helpshift APIs
Discover ways to do customer support via Helpshift.
![]()
Design
Theming and Skinning your SDK to look like your App.
![]()
Going International
Localizing & Internationalizing your in-app Support.
![]()
Notifications
Configure Push and In-app notifications.
![]()
Tracking
Track events and user actions. Attach custom metadata to every conversation.
![]()
Reviews & Feedback
Asking for reviews and feedback.