Getting Started Android
Getting started with integrating Helpshift in your Unity app.
Guide to integrating the Unity plugin for the Helpshift SDK X which you can call from your C# and Javascript game scripts.
Requirements
- Unity 5.5.6 and above.
- Supported Android OS version: 16 and above
Download Helpshift Unity SDK
1. SDK X - In-app Customer Service
Helpshift SDK .zip folder includes:
- helpshiftX-plugin-unity-v10.2.1.unitypackage
- Unity package of Helpshift SDK
- unity-jar-resolver (v1.2.160.0)
- Resolves Android Helpshift package support lib dependencies.
Add Helpshift to your Unity project
- Unzip the Helpshift Unity SDK package.
- Helpshift Unity SDK appears as a standard
.unitypackagewhich you can import through the Unity package import procedure. - Following are the steps to import the
helpshiftx-plugin-unity-version.unitypackageinto your Unity game:- In the Open Unity project, navigate to Assets drop-down menu and select the Import Package > Custom Package
- From the unzipped SDK, select
helpshiftx-plugin-unity-version.unitypackagefile to import the Helpshift SDK. - In the Import Unity Package window, click Import
- If you are also integrating for iOS, select
iOS/Helpshift.frameworkfolder while importing the unitypackage. Refer here.
Resolve Android Appcompat library requirements
Helpshift SDK depends on android appcompat libraries. You can get these libraries in one of the following ways depending on the build process that you use.
Resolve dependency when using Unity's Internal or Unity's internal Gradle build system
Use Unity Jar Resolver plugin to download and integrate android library dependencies.
If your project already uses the Unity Jar Resolver, you can skip the Unity Jar Resolver importing step.
- Import the Unity Jar Resolver plugin into your Unity project
- In the Open Unity project, navigate to Assets drop-down menu and select the Import Package > Custom Package
- From the unzipped Helpshift SDK, select
unity-jar-resolver/external-dependency-manager-1.2.160.unitypackagefile to import the Unity Jar resolver. - In the Import Unity Package window, click Import
If you are not able to import Unity Jar Resolver packaged with Helpshift plugin due to any reason, you can use any version of Unity Jar Resolver as per your needs. Refer here: Unity Jar Resolver
- If the Unity Jar resolver wants to enable Android Auto-resolution, click the Enable button, to resolve all the dependencies automatically on changing any dependency file. You can enable or disable the settings using Assets > Play Services Resolver > Android Resolver > Settings
- By default, the Unity jar resolver auto-resolves all the required dependencies. Following are the steps to resolve dependencies manually:
- In the Open Unity project, navigate to Assets dropdown menu and choose Play services resolver > Android Resolve
- Select the Resolve or Force Resolve
- To know more about the Unity Jar Resolver, refer to: Unity Jar Resolver
Resolve dependency when using custom Gradle template or Export Project
Unity's in-built gradle build support and exporting to android studio does not support per plugin gradle script. Therefore, by default, Helpshift SDK cannot add the dependencies by itself.
The mainTemplate.gradle is genereted when you enable the Custom Gradle Template property on the Player window.
The build.gradle exists in generated Gradle project when you enable the Export Project property on the Player window and Build the project.
Update dependencies section of the mainTemplate.gradle or build.gradle file as:
dependencies {
    implementation fileTree(dir: 'libs', include: ['*.jar'])
    implementation(name: 'Helpshift', ext:'aar')
    implementation 'com.android.support:appcompat-v7:28.0.0'
    //...
}
Initializing Helpshift in your app
To use Helpshift's APIs, please import the Helpshift's namespace like below
using Helpshift;
Helpshift uniquely identifies each registered App with a combination of 2 tokens:
Domain Name- Your Helpshift domain. E.g. happyapps.helpshift.com
Platform ID- Your App's unique platform id (App's
App Idon dashboard is your platform Id)
Settings>SDK (for Developers) in your agent dashboard.
Select your App and check Android as a platform from the dropdowns and copy
the 2 tokens to be passed when initializing Helpshift.
show me 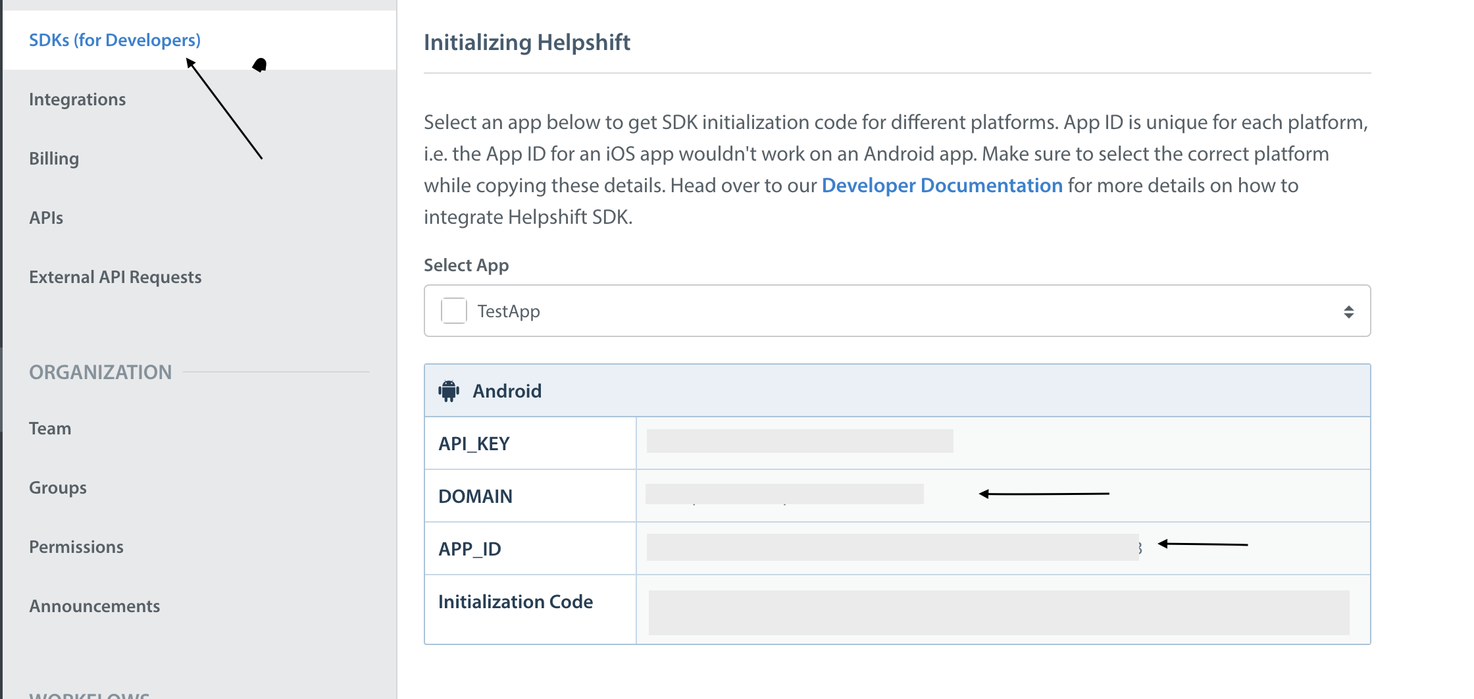
Initialize Helpshift by calling the method install(platformId, domain) API
using Helpshift;
.
.
.
public class MyGameControl : MonoBehaviour
{
    private HelpshiftSdk help;
    ...

    void Awake() {
        help = HelpshiftSdk.GetInstance();
        var configMap = new Dictionary<string, object>();
        help.Install(platformId, domainName, configMap);
    }
    ...
}
Placing the install call
You should place install call inside the Awake() method. Placing it elsewhere might cause unexpected runtime problems.
HelpshiftInitializationException
Calling any API before the install call would throw an unchecked HelpshiftInitializationException in debug mode.
Android OS version Support
Calling install() below android SDK version 21 will not work. All the APIs will be non operable.
Integrating Feedback Section

You can use the API call help.ShowConversation(configMap) to allow a user to directly send feedback or start a new conversation without having to first view FAQs. Once, a user starts a new conversation, this API call will show the conversation screen. The conversation will continue until it is resolved or rejected by the agent.
To configure SDK, you can pass various config options in a Dictionary<string, object>. It is advised to add Initial User Message in the configMap.
Example :
using Helpshift;

private HelpshiftSdk help;

// install call here
void Awake(){
    help = HelpshiftSdk.GetInstance();
    help.Install(platformId, domainName, null);
}

void openHelpshift(){
    // configuration map
    Dictionary<string, object> configMap = new Dictionary<string, object>
        {
            { "tags", new String[] { "foo", "bar" } },
            { "initialUserMessage", "Give Feedback"}
        };

    // open the support chat screen
    help.ShowConversation(configMap);
}
Integrating FAQs

You can use the API call ShowFAQs(configMap) to provide a way for the user to invoke the purpose-built help/FAQs section in your app. This is the easiest approach to enable help in your app as it bundles all the capabilities of the Helpshift SDK in a simple and intuitive interface. You can wire this API call to a "Help" or "FAQs" action in your app.
To configure the FAQs screen, you can pass various config options in a Dictionary<string, object>. It is advised to add Initial User Message in the configMap.
Example :
using Helpshift;

private HelpshiftSdk help;

// install call here
void Awake(){
    help = HelpshiftSdk.GetInstance();
    help.Install(platformId, domainName, null);
}

void ShowFAQs(){

    // configuration map
    Dictionary<string, object> configMap = new Dictionary<string, object>
        {  // other values
            { "tags", new String[] { "foo", "bar" } },
            { "initialUserMessage", "Give Feedback"}
        };

    // open the FAQs screen
    help.ShowFAQs(configMap);

}
Adding Custom Metadata to Feedback
If you want to add Custom Metadata at the time of Issue creation, follow the steps.
- Initialize a top-level custom metadata
Dictionary - Define your custom metadata
Dictionary - Add the key-value pairs in that custom metadata
Dictionary - Add the custom metadata map to the top-level map
- Pass the map to
configMapwith key"customMetadata"to any of the SDK X APIs (likeShowConversation(configMap)).
Use code:
using Helpshift;

private HelpshiftSdk help;

void Awake(){
    // install call here
}

void openHelpshift(){
    Dictionary<string, string> customMetadataDictionary = new Dictionary<string, string>();
    customMetadataDictionary.Add("Level", "9");
    customMetadataDictionary.Add("Spend", "46.55 USD");
    customMetadataDictionary.Add("Device Timestamp", DateTime.UtcNow.ToLongTimeString());


    Dictionary<string, object> config = new Dictionary<string, object>();
    // other configs...
    //..
    config.Add("customMetadata", customMetadataDictionary);

    help.ShowConversation(configMap);
}
Metadata should only be sent as String key-value pairs.
Set Custom Issue Fields
On Custom Issue Fields keys & compatibility
- Custom Issue Fields must be created in the Helpshift Dashboard (Settings → Custom Issue Fields), otherwise they will be ignored. Read more here
If you want to set Custom Issue Fields at the time of Issue creation, follow the steps.
- Initialise a top level custom issue fields'
Dictionary - Define your custom issue field
Dictionary - Add the
"type"and"value"for that custom issue field - Add the custom issue field map to top level map (with key as your configured key and value as custom issue field map)
- Pass the map to
configMapwith key"customIssueFields"of theShowConversation(configMap)
using Helpshift;

private HelpshiftSdk help;

void Awake(){
    // install call here
}

void openHelpshift(){

    Dictionary<string, object> joiningDate = new Dictionary<string, object>();
    joiningDate.Add("type", "date");
    joiningDate.Add("value", DateTimeOffset.UtcNow.ToUnixTimeMilliseconds());

    Dictionary<string, string> stockLevel = new Dictionary<string, string>();
    stockLevel.Add("type", "number");
    stockLevel.Add("value", "1505");

    Dictionary<string, string> employeeName = new Dictionary<string, string>();
    employeeName.Add("type", "singleline");
    employeeName.Add("value", "Bugs helpshift");

    Dictionary<string, string> isPro = new Dictionary<string, string>();
    isPro.Add("type", "boolean");
    isPro.Add("value", "true");

    Dictionary<string, object> cifDictionary = new Dictionary<string, object>();
    cifDictionary.Add("joining_date", joiningDate);
    cifDictionary.Add("stock_level", stockLevel);
    cifDictionary.Add("employee_name", employeeName);
    cifDictionary.Add("is_pro", isPro);


    Dictionary<string, object> config = new Dictionary<string, object>();
    // other configs...
    //..
    config.Add("customIssueFields", cifDictionary);

    help.ShowConversation(configMap);
}
The following are the valid values for the type key of a Custom Issue Field.
- "singleline"
- "multiline"
- "number"
- "checkbox"
- "dropdown"
- "date"
Compatibility table for type and values:
| Type | Value | Comments |
|---|---|---|
| singleline | string | Character limit of 255 |
| multiline | string | Character limit of 100,000 |
| number | string | |
| dropdown | string | Drop-down options should exist for the given Custom Issue Field |
| date | number | Epoch time. For example - Date.now() |
| checkbox | boolean |