Getting Started
Getting started with integrating Helpshift in your iOS app.
Requirements
- Xcode 12.0 and above.
- Cocoapods v1.10.0
- Supported iOS versions:
- iOS 15, 14, 13, 12, 11, 10
Automated Integration using Cocoapods
To start using SDK X v10.2.1 in your project, add the following line to your Podfile
pod 'HelpshiftX', '10.2.1'
And run pod install or pod update to refresh your
cocoapods dependencies.
You can now move on to Initializing Helpshift in your App.
Automated Integration using Swift Package Manager
To start using Helpshift v10.2.1 in your SPM project, add the following package URL to your project's "Package Dependencies" section
https://github.com/helpshift/HelpshiftX
For version rules, we recommend using either "Exact" or "Up to Next Minor" and manually updating the version number when a major version of Helpshift SDK is released.
You can now move on to Initializing Helpshift in your App.
Manual Integration
Get the latest SDK zip
Download the latest Helpshift iOS SDK from here.
The zip file contains
- HelpshiftX.xcframework
- The HelpshiftX framework
- NOTICE.txt/
- License information about third-party code.
Add the latest stable SDK release to your project
- Unzip the SDK and drag drop
HelpshiftX.xcframeworkinto your Xcode project - In the
Generalsection of your app target, verify that theHelpshiftX.xcframeworkis present in theFramework, Libraries, and Embedded Contentsection with the optionEmbed and Signselected from the Embed options dropdown. show me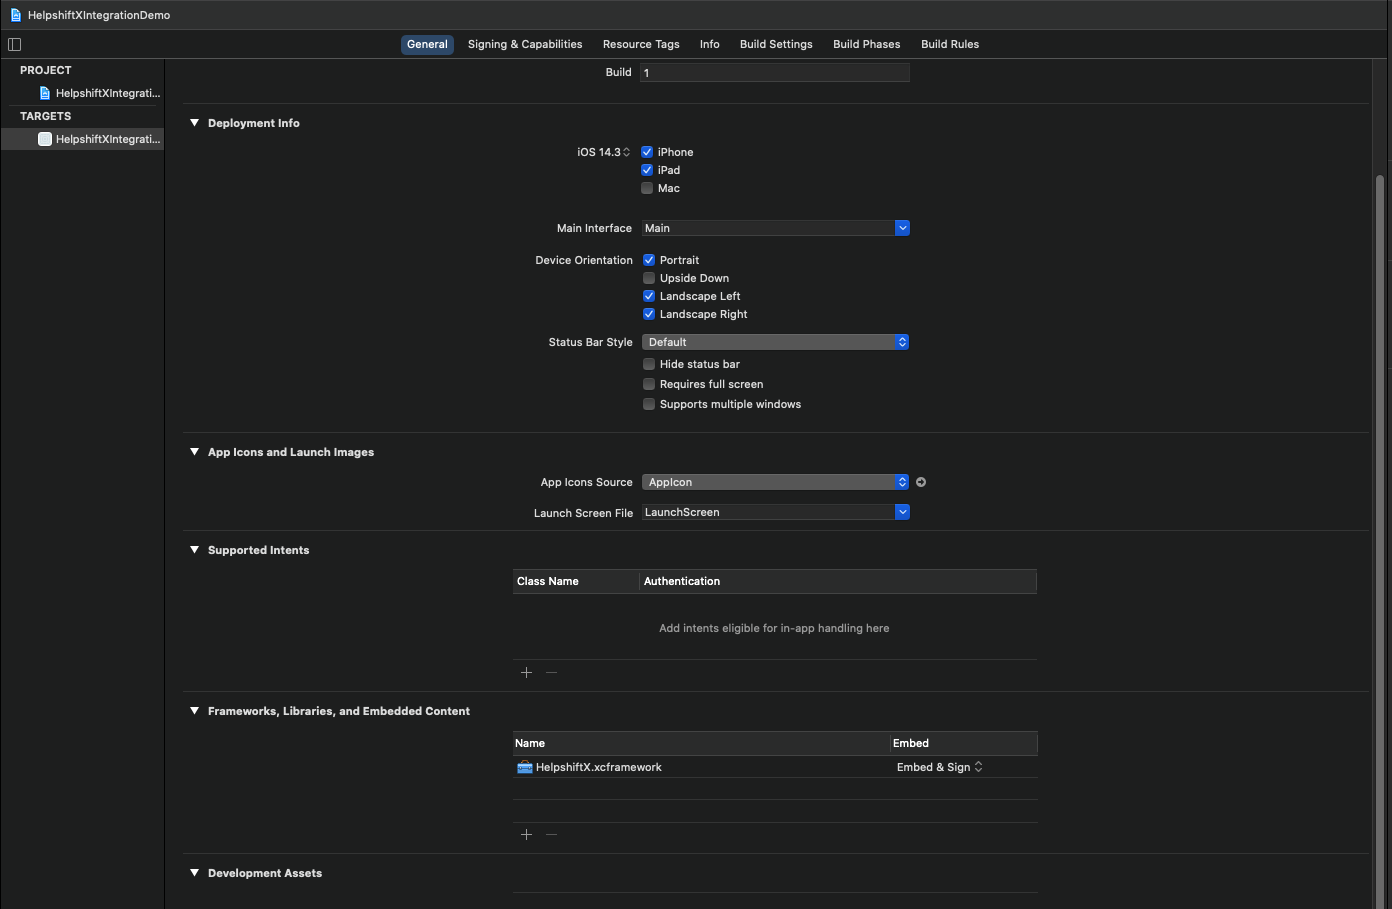
- After successful integration,
Build Phasesshould look like this: show me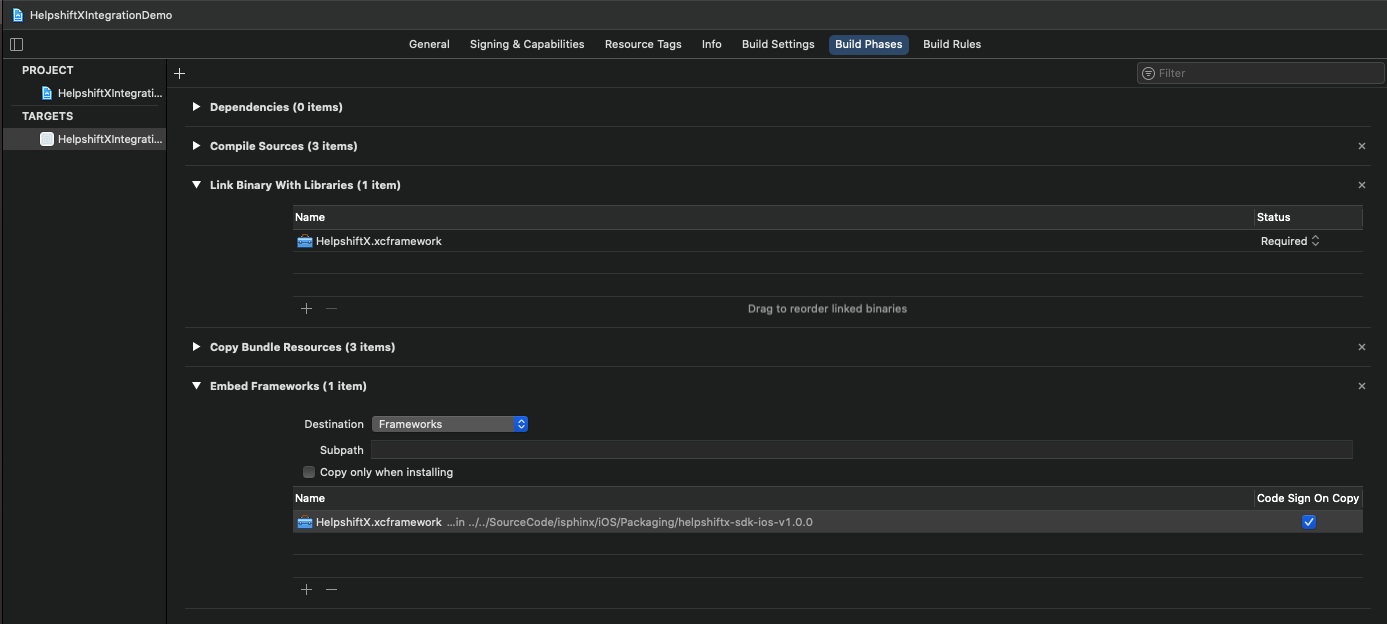
Info.plist changes - Addition of usage description strings
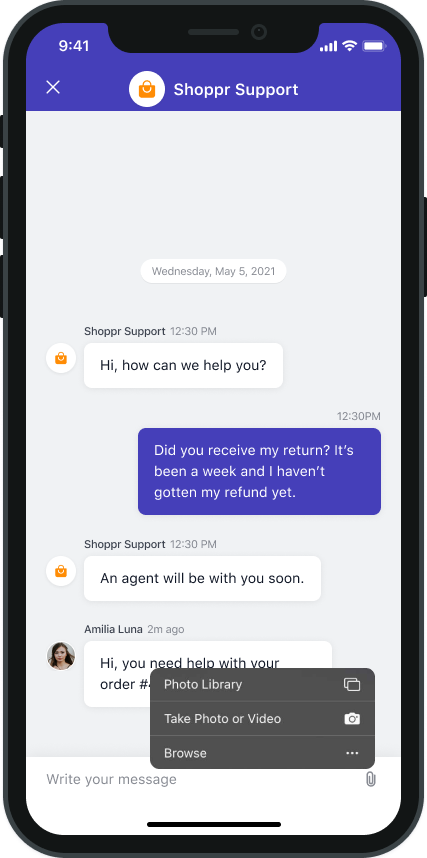
“User Attachments” feature is enabled for SDK which allows User to upload an attachment. The attachments can be picked from the Photo Library or can be captured directly using the camera. The options for these sources look like:
To use the camera and photo library, Apple requires the app to have Usage Description strings in the Info.plist while. Failing to add these strings might result in app rejection. The following strings are needed for the attachment feature:
| Key | Suggested string | Notes |
|---|---|---|
| NSPhotoLibraryUsageDescription | “We need to access photos library to allow users manually pick images meant to be sent as an attachment for help and support reasons.” | This is not needed if your app is iOS 11 or above. Below iOS 11, this key is compulsory else the app may crash when user tries to open the photo library for attaching photos. |
| NSCameraUsageDescription | “We need to access the camera to allow users to click images meant to be sent as an attachment for help and support reasons.” | This key is needed for capturing a photo using camera and attaching it. |
| NSMicrophoneUsageDescription | “We need to access the microphone to allow users to record videos using camera meant to be sent as an attachment for help and support reasons.” | This key is needed for capturing a video using camera and attaching it. |
End-users can attach files such as pdf, video, etc in their issues. For iOS 10 and below, to access files in the “Files” app of iOS, developers will need to add iCloud capability with iCloud Documents services enabled. For more info please refer the Prerequisites section here.
show me 
Initializing Helpshift in your app
Helpshift uniquely identifies each registered App using a combination of 2 tokens:
Platform ID- This is your platform Id.
Domain Name- This is your Helpshift domain name e.g. happyapps.helpshift.com
Config- An
NSDictionaryrepresenting the configuration parameters for the installation.
You can find these by navigating to Settings>SDK (for Developers) in your agent dashboard.
Select your App and check iOS as a platform from the dropdowns and copy
the 2 tokens to be passed when initializing Helpshift.
show me 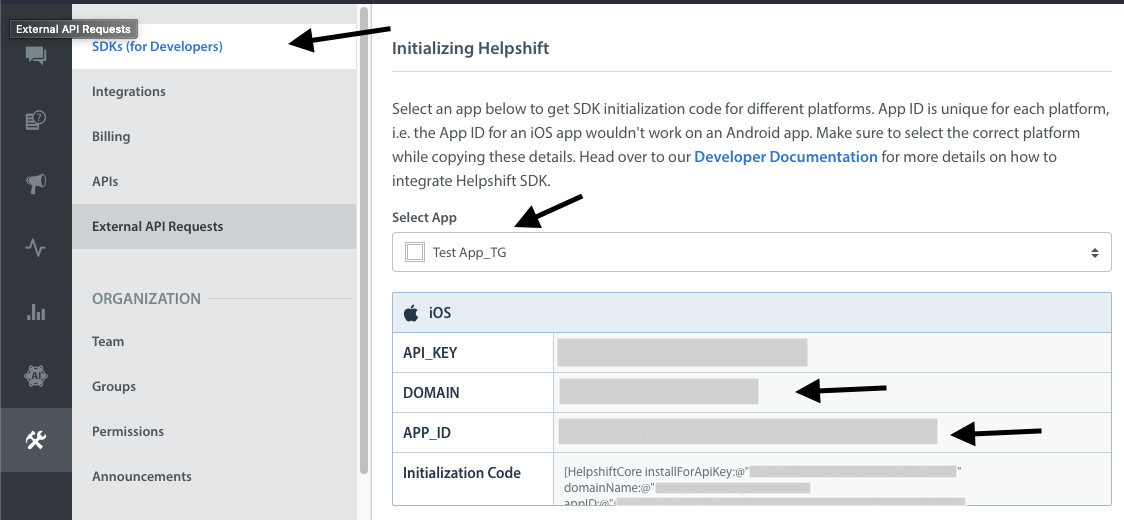
@import HelpshiftX;
...
- (BOOL)application:(UIApplication *)application didFinishLaunchingWithOptions:(NSDictionary *)launchOptions
{
    ...
    NSDictionary *config = @{} // Your config
    [Helpshift installWithPlatformId:@"YOUR_PLATFORM_ID"
                              domain:@"YOUR_DOMAIN"
                              config:config];
    ...
    return YES;
}
import HelpshiftX
...
    func application(_ application: UIApplication, didFinishLaunchingWithOptions launchOptions: [UIApplication.LaunchOptionsKey: Any]?) -> Bool {
        ...
        let config = [String:String]() // Your config
        Helpshift.install(withPlatformId: "YOUR_PLATFORM_ID", domain: "YOUR_DOMAIN", config: config)
        ...
        return true
    }
...
Placing the install call
You should not place the install call anywhere other than application:didFinishLaunchingWithOptions:
Placing it elsewhere might cause unexpected runtime problems.
Helpshift install call will throw InstallException in case the validation of the SDK keys fail.
Integrating Feedback Section
You can use the API call showConversationWith:config: to allow a user to directly send feedback without having to first view FAQs. This API call will show the feedback screen to the User.
    NSDictionary *config = @{ @"initialUserMessage": @"Give Feedback" };
    [Helpshift showConversationWith:self config:config];
    let config = ["initialUserMessage": "Give Feedback"]
    Helpshift.showConversation(with:self, config:config)
Integrating FAQs
You can use the API call showFAQsWith:config: to provide a way for the user to invoke the purpose-built help/support section in your app. This is the easiest approach to enable help in your app as it bundles all the capabilities of the Helpshift SDK in a simple and intuitive interface. You can wire this API call to a "Help" or "FAQs" action in your app.
    NSDictionary *config = @{ @"initialUserMessage": @"Give Feedback" };
    [Helpshift showFAQsWith:self config:config];
    let config = ["initialUserMessage": "Give Feedback"]
    Helpshift.showFAQs(with:self, config:config)
Attaching Custom Metadata to feedback
You can attach additional metadata to every new feedback started by the app user. This metadata can include properties like username, email, game scores, current game levels, and any other data needed to provide relevant context for each new feedback. You can attach custom metadata passing it to the config dictionary at the time of calling any of the SDK APIs (showConversation, showFAQs).
Example:-
NSDictionary *customMetadata = @{ @"usertype": @"paid",
                                  @"level": @"7",
                                  @"score": @"12345"
 };

NSDictionary *config = @{ @"customMetadata" : customMetadata };
[Helpshift showConversationWith:self config:config];
let customMetadata = [ "usertype": "paid",
                       "level": "7",
                       "score": "12345" ];
let config = ["customMetadata":customMetadata]
Helpshift.showConversation(with: self, config: config)
Metadata should only be sent as String key-value pairs.
- Once customMetadata is set, if you want to reset it, then you’ll have to call the SDK X API with an empty dictionary, i.e.,
let customMetadata = [String: String]();
let config = ["customMetadata":customMetadata]
Helpshift.showConversation(with: self, config: config)
Attaching Custom Issue Fields to feedback
On Custom Issue Fields keys & compatibility
- Custom Issue Fields must be created in the Helpshift Dashboard (Settings → Custom Issue Fields), otherwise they will be ignored. Read more here
You can attach Custom Issue Fields to every new feedback started by the user. A Custom Issue Field should have a key, a datatype, and a value. The Helpshift SDK allows the addition of Custom Issue Fields by using the customIssueFields method in the ApiConfig object.
These Custom Issue Fields would be sent whenever a new feedback is started by the end user.
As soon as an end user opens the feedback screen, they see a greeting message, and the feedback is considered active. All the modified Custom Issue Fields (updated during an active feedback) will only be sent with the next feedback that end user starts.
Possible datatypes to be passed into the config are:
| Type | value | Comments |
|---|---|---|
| "singleline" | string | Single line string with character limit of 255 |
| "multiline" | string | Multi line string with character limit of 100,000 |
| "number" | string | String representation of number. For eg. "12345" |
| "dropdown" | string | Drop-down options should exist for the given Custom Issue Field on dashboard. Value should be one of the values specified on the dashbaord for that dropdown. |
| "date" | long long int | Epoch time in milliseconds. For eg. 1505927361535 |
| "checkbox" | string | String representation of boolean. For eg. "true" or "false". This corresponds to the checkbox type custom issue field on dashboard. |
Example:-
NSDictionary *cifs = @{ @"joining_date": @{ @"type":@"date", @"value":@1505927361535 },
                         @"stock_level": @{ @"type":@"number", @"value":@"1505" },
                       @"employee_name": @{ @"type":@"singleline", @"value":@"ABC" },
                    @"employee_address": @{ @"type":@"multiline", @"value":@"303,Joy plaza,Park street,Viman nagar.Pune-432123" },
                     @"salary_currency": @{ @"type":@"dropdown", @"value":@"Dollars" } };

NSDictionary *config = @{ @"customIssueFields" : cifs };
[Helpshift showConversationWith:self config:config];
let cifs = [ "joining_date": [ "type":"date", "value":1505927361535 ],
                                 "stock_level": [ "type":"number", "value":"1505" ],
                               "employee_name": [ "type":"singleline", "value":"ABC" ],
                            "employee_address": [ "type":"multiline", "value":"303,Joy plaza,Park street,Viman nagar.Pune-432123" ],
                             "salary_currency": [ "type":"dropdown", "value":"Dollars" ] ];
let config = ["customIssueFields":cifs]
Helpshift.showConversation(with: self, config: config)